
Last updated on December 27, 2023
You need a Raspberry Pi with either Raspbian, Ubuntu Server or DietPi installed. For this guide we’re using Ubuntu Server as the operating system (use 64bit if you have Raspberry Pi 3 B+ or newer), but all commands and such should be similar with the other operating systems as well.
Useful tools before you start
SD Card Formatter – Whenever you need to format your SD card, use this tool.
Balena Etcher – Tool to flash the OS to your SD card.
Operating Systems
| OS | Description | Download |
| Raspberry Pi OS (desktop, lite) | Recommended operating system for most users. | https://www.raspberrypi.com/software/operating-systems/ |
| Ubuntu (desktop, server, core) | Ubuntu is the most popular linux distribution. | https://ubuntu.com/download/raspberry-pi |
| DietPi | Minmalistic OS for better performance or if you want to install only what you need. | https://dietpi.com/#download |
Let’s begin
Download the image and insert the Raspberry Pi’s micro SD card into your computer meanwhile you wait for the download to finish. When the download is finished, download and run/install balenaEtcher: https://www.balena.io/etcher/
Select the image you downloaded, then select the micro SD card in your computer and click on flash. When it is done you can remove the micro SD card from your computer and insert it into your Raspberry Pi and turn on the power. The Raspberry Pi will now boot up and you can log into it by finding the IP-address from your router and using a terminal. We recommend Termius as it is a really good and free terminal for all systems: https://termius.com/
First time you log into it via SSH your username and password is the default for the operating system you installed showed to the right here.
On the first login you will be asked to change the password which we recommend that you do.
| Operating system | Username | Password |
| Ubuntu Server | ubuntu | ubuntu |
| Raspbian | Chosen upon first boot | Chosen when user is created on first boot |
| DietPi | root | dietpi |
If you want to use DietPi follow the guide here: https://dietpi.com/blog/?p=564
And for information on how to enable encrypted DNS with DietPi and Unbound check out this page: https://dietpi.com/docs/software/dns_servers/
Setting up Pi-hole
Type in this in your terminal window:
curl -sSL https://install.pi-hole.net | bashWhen the installation is done open a browser window and type in your raspberry pi’s IP-address (example: 192.168.1.200/admin) to log into your pi-hole admin page. You can change the password by entering the following command:
pihole -a -pIf you want to remove the password, just hit enter after running the command above.
Setting up the DNS server
Open up a terminal window and choose one of the installs below (stubby or unbound). If you are concerned about privacy and don’t trust public DNS resolvers you should go with unbound. You may also install and run both if you want to have a backup, for example unbound as main DNS and then stubby through Cloudflare as secondary DNS. Both guides below uses different ports to make this possible for those that are interested in this.
Unbound (recommended)
Unbound is “a caching DNS resolver.” It directly communicates with the authoritative name servers and does the resolving itself, avoiding the need for a upstream resolver. It has very efficient caching and is generally quite fast.
For this guide you don’t need to think about public DNS resolvers as Unbound will become your private DNS resolver.
sudo apt install unbound -yThe main configuration file is /etc/unbound/unbound.conf.d/pihole.conf. You can open the file with:
sudo nano /etc/unbound/unbound.conf.d/pihole.confPaste in the follwing configuration in your pihole.conf file:
server:
    # If no logfile is specified, syslog is used
    # logfile: "/var/log/unbound/unbound.log"
    verbosity: 0

    interface: 127.0.0.1
    interface: ::1
    port: 5353
    do-ip4: yes
    do-udp: yes
    do-tcp: yes

    cache-max-ttl: 14400
    cache-min-ttl: 600

    # May be set to yes if you have IPv6 connectivity
    do-ip6: yes

    # You want to leave this to no unless you have *native* IPv6. With 6to4 and
    # Terredo tunnels your web browser should favor IPv4 for the same reasons
    prefer-ip6: no

    # Use this only when you downloaded the list of primary root servers!
    # If you use the default dns-root-data package, unbound will find it automatically
    #root-hints: "/var/lib/unbound/root.hints"

    # Trust glue only if it is within the server's authority
    harden-glue: yes

    # Require DNSSEC data for trust-anchored zones, if such data is absent, the zone becomes BOGUS
    harden-dnssec-stripped: yes

    # Don't use Capitalization randomization as it known to cause DNSSEC issues sometimes
    # see https://discourse.pi-hole.net/t/unbound-stubby-or-dnscrypt-proxy/9378 for further details
    use-caps-for-id: no

    # Reduce EDNS reassembly buffer size.
    # Suggested by the unbound man page to reduce fragmentation reassembly problems
    edns-buffer-size: 1232

    # Perform prefetching of close to expired message cache entries
    # This only applies to domains that have been frequently queried
    prefetch: yes

    # One thread should be sufficient, can be increased on beefy machines. In reality for most users running on small networks or on a single machine, it should b>
    num-threads: 1

    # Ensure kernel buffer is large enough to not lose messages in traffic spikes
    so-rcvbuf: 1m

    # Ensure privacy of local IP ranges
    private-address: 192.168.0.0/16
    private-address: 169.254.0.0/16
    private-address: 172.16.0.0/12
    private-address: 10.0.0.0/8
    private-address: fd00::/8
    private-address: fe80::/10

## If you want to use DNS over TLS (encrypted DNS) uncomment the lines below with only one #
    ## TLS settings
    tls-upstream: yes
    tls-cert-bundle: "/etc/ssl/certs/ca-certificates.crt"

   # Increase privacy
    minimal-responses: yes

    # Enable round-robin balancing
    rrset-roundrobin: yes

    ssl-upstream: yes

    # Send minimum amount of information to upstream servers to enhance
    # privacy. Only sends minimum required labels of the QNAME and sets
    # QTYPE to NS when possible.

    # See RFC 7816 "DNS Query Name Minimisation to Improve Privacy" for
    # details.
  # Uncomment if the file /etc/unbound/unbound.conf.d/qname-minimisation.conf does not exist
#    qname-minimisation: yes

    hide-identity: yes
    hide-version: yes

    ## upstream resolver settings
    forward-zone:
    name: "."
    ## Cloudflare DNS
    forward-addr: 1.1.1.2@853 # cloudflare-dns.com primary
    forward-addr: 1.0.0.2@853 # cloudflare-dns.com secondary
    ## Quad 9 'secure' service - Filters, does DNSSEC, does ECS
    forward-addr: 9.9.9.11@853 # dns.quad9.net primary
    forward-addr: 149.112.112.11@853 # dns.quad9.net secondary
    ## Quad 9 'secure' service - Filters, does DNSSEC, doesn't send ECS
    forward-addr: 9.9.9.9@853 # dns.quad9.net primary
    forward-addr: 149.112.112.112@853 # dns.quad9.net secondary
    ## IPv6  Cloudflare DNS over TLS
    forward-addr: 2606:4700:4700::1111@853 # cloudflare-dns.com primary
    forward-addr: 2606:4700:4700::1001@853 # cloudflare-dns.com secondary
    ## IPv6  Quad 9 'secure' service - Filters, does DNSSEC, does ECS
    forward-addr: 2620:fe::11@853 # dns.quad9.net primary
    forward-addr: 2620:fe::fe:11@853 # dns.quad9.net secondary
    ## IPv6  Quad 9 'secure' service - Filters, does DNSSEC, doesn't send ECS
    forward-addr: 2620:fe::fe@853 # dns.quad9.net primary
    forward-addr: 2620:fe::9@853 # dns.quad9.net secondary
Save the file and restart your local recursive server for the changes to take effect and test that it’s operational:
sudo service unbound restartdig pi-hole.net @127.0.0.1 -p 5353
The first query may be quite slow, but subsequent queries, also to other domains under the same TLD, should be fairly quick.
Our next step is to ensure that Pi Hole’s faster-than-light (FTL) daemon adheres to the “edns-packet-max” limit we set in Rebound. To set this, we need to write a config file within the “/etc/dnsmasq.d” directory by using the command below.
sudo nano /etc/dnsmasq.d/99-edns.confYou will want to add the following line within this file.
edns-packet-max=1232With the line added, you can save and quit by pressing CTRL + X, followed by Y, and then the ENTER key.
For those running Raspberry Pi OS Debian 11 (Bullseye) and newer, you must disable the “Unbound resolvconf” service that is automatically created during installation.
To disable the “Unbound resolvconf” service, use the following command in the terminal.
sudo systemctl disable --now unbound-resolvconf.serviceNext, we must disable the “resolvconf_resolvers.conf” file so that it isn’t evoked by resolvconf itself.
sudo sed -Ei 's/^unbound_conf=/#unbound_conf=/' /etc/resolvconf.confFor our configuration changes to take effect, you must restart the Unbound service.
sudo service unbound restartYou can test DNSSEC validation using
dig sigfail.verteiltesysteme.net @127.0.0.1 -p 5353dig sigok.verteiltesysteme.net @127.0.0.1 -p 5353
The first command should give a status report of SERVFAIL and no IP address. The second should give NOERROR plus an IP address.
Stubby
Stubby is “an application that acts as a local DNS Privacy stub resolver (using DNS-over-TLS). Stubby encrypts DNS queries sent from a client machine (desktop or laptop) to a DNS Privacy resolver increasing end user privacy.” Stubby is basically an encryption stub that encrypts the DNS traffic between you and an upstream resolver.
For this guide, Cloudflare DNS is chosen, but you can choose whatever DNS provider you prefer/trust.
sudo apt install stubby -yThe main configuration file is /etc/stubby/stubby.yml. You can open the file with:
sudo nano /etc/stubby/stubby.ymlThe following line makes stubby run as a stub resolver instead of a full recursive resolver, which is why it’s named stubby.
resolution_type: GETDNS_RESOLUTION_STUB
The following configuration make stubby send DNS queries encrypted with TLS. It will not send quries in plain text.
dns_transport_list:
- GETDNS_TRANSPORT_TLS
This following line requires a valid TLS certificate on the remote recursive resolver.
tls_authentication: GETDNS_AUTHENTICATION_REQUIRED
The following lines set the listen addresses for the stubby daemon. By default, IPv4 and IPv6 are both enabled.
listen_addresses:
- 127.0.0.1
- 0::1
Standard port is 53, but we’re going to change this to 5053. Edit the listen addresses so it looks like this:
listen_addresses:
- 127.0.0.1@5053
- 0::1@5053
The following line make stubby query recursive resolvers in a round-robin fashion. If set to 0, Stubby will use each upstream server sequentially until it becomes unavailable and then move on to use the next.
round_robin_upstreams: 1
By default there are 3 recursive resolvers enabled in stubby configuration file. They are run by stubby developers and support DNS over TLS. You can choose to leave them enabled or disable them by putting an # in front.
Scroll down to the upstream_recursive_servers: section and add one of the following 3 texts above the other DNS servers.
1. Recommended IPv4
## CloudFlare malware blocking servers
  - address_data: 1.1.1.2
    tls_auth_name: "cloudflare-dns.com"
  - address_data: 1.0.0.2
    tls_auth_name: "cloudflare-dns.com"
## Quad 9 'secure' service - Filters, does DNSSEC, does ECS
  - address_data: 9.9.9.11
    tls_auth_name: "dns.quad9.net"
  - address_data: 149.112.112.11
    tls_auth_name: "dns.quad9.net"
## Quad 9 'secure' service - Filters, does DNSSEC, doesn't send ECS
  - address_data: 9.9.9.9
    tls_auth_name: "dns.quad9.net"
  - address_data: 149.112.112.112
    tls_auth_name: "dns.quad9.net"
2. Recommended IPv6
## Cloudflare servers
  - address_data: 2606:4700:4700::1111
    tls_auth_name: "cloudflare-dns.com"
  - address_data: 2606:4700:4700::1001
    tls_auth_name: "cloudflare-dns.com"
## Quad 9 'secure' service - Filters, does DNSSEC, does ECS
  - address_data: 2620:fe::11
    tls_auth_name: "dns.quad9.net"
  - address_data: 2620:fe::fe:11
    tls_auth_name: "dns.quad9.net"
## Quad 9 'secure' service - Filters, does DNSSEC, doesn't send ECS
  - address_data: 2620:fe::fe
    tls_auth_name: "dns.quad9.net"
  - address_data: 2620:fe::9
    tls_auth_name: "dns.quad9.net"
3. Standard DNS
# CloudFlare servers
  - address_data: 1.1.1.1
    tls_auth_name: "cloudflare-dns.com"
  - address_data: 1.0.0.1
    tls_auth_name: "cloudflare-dns.com"
4. Malware blocking
# CloudFlare servers
  - address_data: 1.1.1.2
    tls_auth_name: "cloudflare-dns.com"
  - address_data: 1.0.0.2
    tls_auth_name: "cloudflare-dns.com"
5. Malware and adult content blocking
# CloudFlare servers
  - address_data: 1.1.1.3
    tls_auth_name: "cloudflare-dns.com"
  - address_data: 1.0.0.3
    tls_auth_name: "cloudflare-dns.com"
Then find the following line:
round_robin_upstreams: 1
Change 1 to 0. This will make stubby always use CloudFlare DNS server. If CloudFlare is not available, stubby will use other DNS servers.
Save the file and restart stubby for the changes to take effect and test that it’s operational.
sudo systemctl restart stubbydig pi-hole.net @127.0.0.1 -p 5053
You can test DNSSEC validation using
dig sigfail.verteiltesysteme.net @127.0.0.1 -p 5053dig sigok.verteiltesysteme.net @127.0.0.1 -p 5053
The first command should give a status report of SERVFAIL and no IP address. The second should give NOERROR plus an IP address.
Now that stubby or unbound is set up we can continue setting up pi-hole.
From the Pi-hole admin page go to settings and click on DNS and uncheck all the upstream servers on the left and type in the custom fields under upstream servers on the right as shown in the picture below.
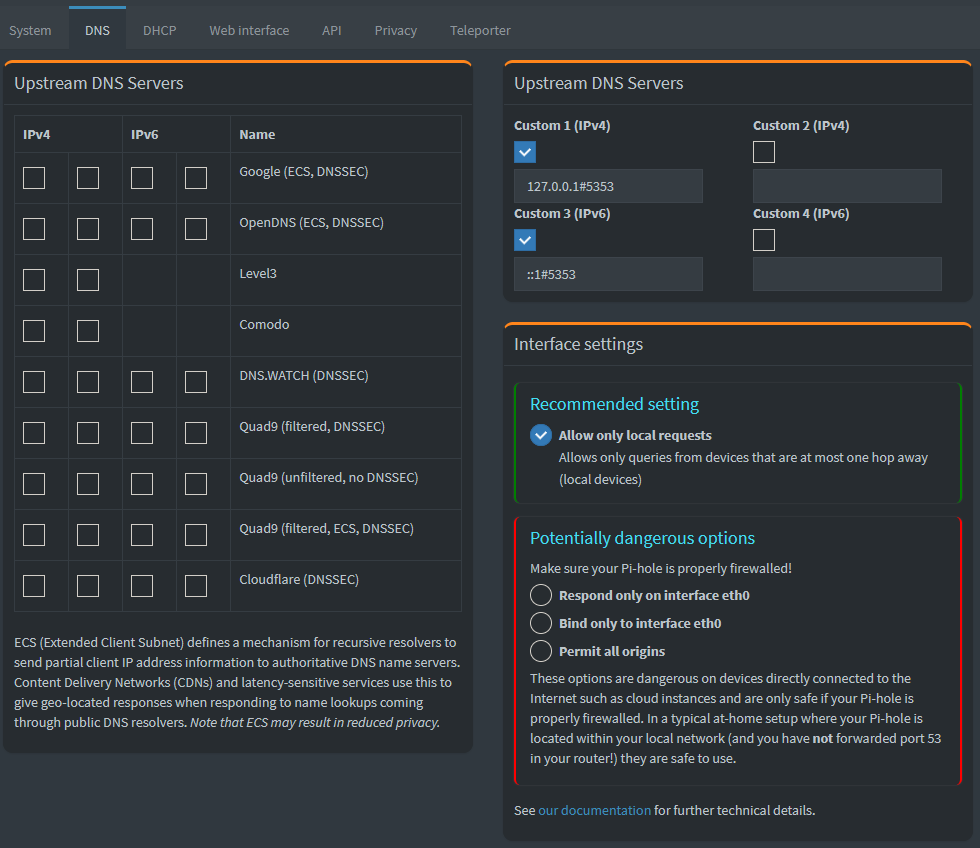
For IPv4 field use: 127.0.0.1#5353
For IPv6 field use: ::1#5353
Insert the port number you chose after the #. Remember to click save at the bottom of the page afterwards.
Whitelisting
Now we should whitelist a couple of pages so that some everyday websites will function as normal.
First off you should take a look at pihole’s own list over commonly whitelisted domains and either add all or those you need: https://discourse.pi-hole.net/t/commonly-whitelisted-domains/212
If you’re lazy and don’t want to check out Pihole’s own list and copy and paste many times over, we’ve compiled one list of the most important domains here which will fix issues with the following services: Google (Maps, Youtube, etc), Microsoft (Windows, Office, Skype, etc), Spotify, Facebook, Plex, Sonarr, Dropbox, Apple (ID, Music, etc), NVIDIA GeForce Experience, Grand Theft Auto V Online, Epic Games Store, Slack, Mozilla Firefox Tracking Protection, Twitch. Just copy and paste in the code below in your terminal window on the Raspberry Pi.
pihole -w clients4.google.com clients2.google.com s.youtube.com video-stats.l.google.com android.clients.google.com reminders-pa.googleapis.com firestore.googleapis.com googleapis.l.google.com dl.google.com www.msftncsi.com outlook.office365.com products.office.com c.s-microsoft.com i.s-microsoft.com login.live.com login.microsoftonline.com g.live.com dl.delivery.mp.microsoft.com geo-prod.do.dsp.mp.microsoft.com displaycatalog.mp.microsoft.com sls.update.microsoft.com.akadns.net fe3.delivery.dsp.mp.microsoft.com.nsatc.net clientconfig.passport.net v10.events.data.microsoft.com v20.events.data.microsoft.com client-s.gateway.messenger.live.com xbox.ipv6.microsoft.com device.auth.xboxlive.com www.msftncsi.com title.mgt.xboxlive.com xsts.auth.xboxlive.com title.auth.xboxlive.com ctldl.windowsupdate.com attestation.xboxlive.com xboxexperiencesprod.experimentation.xboxlive.com xflight.xboxlive.com cert.mgt.xboxlive.com xkms.xboxlive.com def-vef.xboxlive.com notify.xboxlive.com help.ui.xboxlive.com licensing.xboxlive.com eds.xboxlive.com www.xboxlive.com v10.vortex-win.data.microsoft.com settings-win.data.microsoft.com s.gateway.messenger.live.com client-s.gateway.messenger.live.com ui.skype.com pricelist.skype.com apps.skype.com m.hotmail.com sa.symcb.com s{1..5}.symcb.com officeclient.microsoft.com spclient.wg.spotify.com apresolve.spotify.com upload.facebook.com creative.ak.fbcdn.net external-lhr0-1.xx.fbcdn.net external-lhr1-1.xx.fbcdn.net external-lhr10-1.xx.fbcdn.net external-lhr2-1.xx.fbcdn.net external-lhr3-1.xx.fbcdn.net external-lhr4-1.xx.fbcdn.net external-lhr5-1.xx.fbcdn.net external-lhr6-1.xx.fbcdn.net external-lhr7-1.xx.fbcdn.net external-lhr8-1.xx.fbcdn.net external-lhr9-1.xx.fbcdn.net fbcdn-creative-a.akamaihd.net scontent-lhr3-1.xx.fbcdn.net scontent.xx.fbcdn.net scontent.fgdl5-1.fna.fbcdn.net graph.facebook.com b-graph.facebook.com connect.facebook.com cdn.fbsbx.com api.facebook.com edge-mqtt.facebook.com mqtt.c10r.facebook.com portal.fb.com star.c10r.facebook.com star-mini.c10r.facebook.com b-api.facebook.com fb.me bigzipfiles.facebook.com l.facebook.com plex.tv tvdb2.plex.tv pubsub.plex.bz proxy.plex.bz proxy02.pop.ord.plex.bz cpms.spop10.ams.plex.bz meta-db-worker02.pop.ric.plex.bz meta.plex.bz tvthemes.plexapp.com.cdn.cloudflare.net tvthemes.plexapp.com 106c06cd218b007d-b1e8a1331f68446599e96a4b46a050f5.ams.plex.services meta.plex.tv cpms35.spop10.ams.plex.bz proxy.plex.tv metrics.plex.tv pubsub.plex.tv status.plex.tv www.plex.tv node.plexapp.com nine.plugins.plexapp.com staging.plex.tv app.plex.tv o1.email.plex.tv o2.sg0.plex.tv dashboard.plex.tv gravatar.com thetvdb.com themoviedb.com services.sonarr.tv skyhook.sonarr.tv download.sonarr.tv apt.sonarr.tv forums.sonarr.tv placehold.it placeholdit.imgix.net dl.dropboxusercontent.com ns1.dropbox.com ns2.dropbox.com itunes.apple.com s.mzstatic.com appleid.apple.com gfwsl.geforce.com dev.virtualearth.net ecn.dev.virtualearth.net t0.ssl.ak.dynamic.tiles.virtualearth.net t0.ssl.ak.tiles.virtualearth.net android.clients.google.com connectivitycheck.android.com android.clients.google.com clients3.google.com connectivitycheck.gstatic.com msftncsi.com www.msftncsi.com ipv6.msftncsi.com captive.apple.com gsp1.apple.com www.apple.com www.appleiphonecell.com prod.telemetry.ros.rockstargames.com tracking.epicgames.com tracking-protection.cdn.mozilla.net s.amazon-adsystem.com c.amazon-adsystem.com countess.twitch.tv pubsub-edge.twitch.tv cdn-gl.imrworldwide.com files.slack.com api.epicgames.dev r3.o.lencr.orgWe also recommend the whitelist from https://github.com/anudeepND/whitelist to be installed with automatic update. So continue with the following steps:
cd /opt/
sudo git clone https://github.com/anudeepND/whitelist.git
Make the script to run the script at 1AM on the last day of the week
sudo nano /etc/crontabAdd this line at the end of the file:0 1 * * */7 root /opt/whitelist/scripts/whitelist.py
CTRL + X then Y and Enter
sudo python3 whitelist/scripts/whitelist.py
Adlists
We recommend that you add the following adlists in addition to the default ones. Go into your Pi-hole admin page -> Group Management -> Adlists and add the lists you want.
OISD
OISD is a collection many adlists from accross the Internet, and all domains in this list are verified. There shouldn’t be any false positives in this list.
https://big.oisd.nl/Block List Project
The Block List Project maintains many different blocking lists. We recommend at least adding the following lists: Ads, Fraud, Malware, Phising, Ransomware, Scam and Tracking.
# Adshttps://blocklistproject.github.io/Lists/ads.txt# Fraudhttps://blocklistproject.github.io/Lists/fraud.txt# Malwarehttps://blocklistproject.github.io/Lists/malware.txt# Phisinghttps://blocklistproject.github.io/Lists/phishing.txt# Ransomwarehttps://blocklistproject.github.io/Lists/ransomware.txt# Scamhttps://blocklistproject.github.io/Lists/scam.txt# Trackinghttps://blocklistproject.github.io/Lists/tracking.txt
Developer Dan’s Hosts
Developer Dan’s Hosts is another popular list among people on the Internet. There are several lists which is maintained regularly, but we recommend adding the ads & tracking list.
https://www.github.developerdan.com/hosts/lists/ads-and-tracking-extended.txtThe Firebog
The Firebog is a big blocklist collection with links to several lists. It is recommended to only add the lists with green check marks.
# Suspicious Listshttps://raw.githubusercontent.com/PolishFiltersTeam/KADhosts/master/KADhosts.txthttps://raw.githubusercontent.com/FadeMind/hosts.extras/master/add.Spam/hostshttps://v.firebog.net/hosts/static/w3kbl.txt# Advertising Listshttps://adaway.org/hosts.txthttps://v.firebog.net/hosts/AdguardDNS.txthttps://v.firebog.net/hosts/Admiral.txthttps://raw.githubusercontent.com/anudeepND/blacklist/master/adservers.txthttps://s3.amazonaws.com/lists.disconnect.me/simple_ad.txthttps://v.firebog.net/hosts/Easylist.txthttps://pgl.yoyo.org/adservers/serverlist.php?hostformat=hosts&showintro=0&mimetype=plaintexthttps://raw.githubusercontent.com/FadeMind/hosts.extras/master/UncheckyAds/hostshttps://raw.githubusercontent.com/bigdargon/hostsVN/master/hosts# Tracking & Telemetry Listshttps://v.firebog.net/hosts/Easyprivacy.txthttps://v.firebog.net/hosts/Prigent-Ads.txthttps://raw.githubusercontent.com/FadeMind/hosts.extras/master/add.2o7Net/hostshttps://raw.githubusercontent.com/crazy-max/WindowsSpyBlocker/master/data/hosts/spy.txthttps://hostfiles.frogeye.fr/firstparty-trackers-hosts.txt# Malicious Listshttps://raw.githubusercontent.com/DandelionSprout/adfilt/master/Alternate%20versions%20Anti-Malware%20List/AntiMalwareHosts.txthttps://osint.digitalside.it/Threat-Intel/lists/latestdomains.txthttps://s3.amazonaws.com/lists.disconnect.me/simple_malvertising.txthttps://v.firebog.net/hosts/Prigent-Crypto.txthttps://bitbucket.org/ethanr/dns-blacklists/raw/8575c9f96e5b4a1308f2f12394abd86d0927a4a0/bad_lists/Mandiant_APT1_Report_Appendix_D.txthttps://phishing.army/download/phishing_army_blocklist_extended.txthttps://gitlab.com/quidsup/notrack-blocklists/raw/master/notrack-malware.txthttps://raw.githubusercontent.com/Spam404/lists/master/main-blacklist.txthttps://raw.githubusercontent.com/FadeMind/hosts.extras/master/add.Risk/hostshttps://urlhaus.abuse.ch/downloads/hostfile/# Other Listshttps://zerodot1.gitlab.io/CoinBlockerLists/hosts_browser
Phising Army
Phising Army is devoted to fight the criminals and provides protection against phising and malware sites, and so on. 91% of cyber attacks happens through email with links to malware and phising sites. We recommend using the extended blocklist that they provide.
https://phishing.army/download/phishing_army_blocklist_extended.txt
YouTube ads
The following list will block some YouTube ads. The way YouTube changes how they serve ads makes it hard to block them all.
https://ewpratten.github.io/youtube_ad_blocklist/hosts.ipv4.txt
https://ewpratten.github.io/youtube_ad_blocklist/hosts.ipv6.txt
Regex Filters
We would also recommend that you add the regex filters from mmotti.
Add to Pi-Hole
curl -sSl https://raw.githubusercontent.com/mmotti/pihole-regex/master/install.py | sudo python3
For more information visit mmotti’s github page.
The following regex must be manually added to be able to log into digi.no, Inside Telecom, Teknisk Ukeblad and Veier24.
(\.|^)piano\.io$Blocklist Pi-Hole update
Pi-Hole updates the domains to be blocked once a week. It is possible to change this configuration via the terminal:
sudo nano /etc/cron.d/piholeIt is recommended to change the default value of updateGravity to updating it daily. The line will look something like this
11 3 * * 7 root PATH="$PATH:/usr/sbin:/usr/local/bin/" pihole updateGravity >/var/log/pihole/pihole_updateGravity.log || cat /var/log/pihole/pihole_updateGravity.log
We are only interested in the beginning of this line, in this example 11 3 * * 7. If you change the 7 to * here and save then Pi-Hole will update the blocklist daily. The line should then look like this:
11 3 * * * root PATH="$PATH:/usr/sbin:/usr/local/bin/" pihole updateGravity >/var/log/pihole/pihole_updateGravity.log || cat /var/log/pihole/pihole_updateGravity.log
For more information about how to configure crontab we recommend checking out the crontab guru from Cronitor.
Congratulations
That’s it. Now all you need to do to protect your network is to point your DNS in the LAN settings of your router towards the IP address of your pi-hole and your whole network will have increased privacy and be free of ads.
Updating Pi-hole
The web page of your Pi-hole will let you know if there are updates available. To update you log into the Raspberry Pi via SSH with your preferred Terminal and simply run this command:
pihole -upPi 4 MazePro Case
If you have Raspberry Pi 4 with the MazePro Case and want to use the power button on that case to also safely shutdown your Pi 4, then type in the following command and hit enter:
sudo echo "dtoverlay=gpio-shutdown" >> /boot/config.txtNext reboot your Pi 4 for the changes to take effect.
PoE hat fan control
On Ubuntu Server 20.04 LTS the dtparams setting does not work, instead you need a udev rule to control the PoE hat fan. Log into your Raspberry Pi via SSH and run the following code to make sure it says “rpi-poe-fan”.
cat /sys/class/thermal/cooling_device0/typeOnce you’ve confirmed that we will create a new udev rule. Start so by typing.:
sudo nano /etc/udev/rules.d/50-rpi-fan.rulesThen you can use this udev rule as an example:
SUBSYSTEM=="thermal"
KERNEL=="thermal_zone0"
#
# If the temp hits 60c, turn on the fan. Turn it off again when it goes back down to 55.
ATTR{trip_point_3_temp}="60000"
ATTR{trip_point_3_hyst}="5000"
#
# If the temp hits 68c, higher RPM.
ATTR{trip_point_2_temp}="68000"
ATTR{trip_point_2_hyst}="2000"
#
# If the temp hits 80c, higher RPM.
ATTR{trip_point_1_temp}="80000"
ATTR{trip_point_1_hyst}="2000"
#
# If the temp hits 81c, highest RPM.
ATTR{trip_point_0_temp}="81000"
ATTR{trip_point_0_hyst}="5000"
Save the file and exit the editor. The last thing you want to do is to apply the udev rules, do so by running the following command:
sudo udevadm control --reload-rules && sudo udevadm triggerAccessing Pi-hole with HTTPS
If you have a domain and would like to access your pihole from outside your network with HTTPS, this is how you continue to set it up.
sudo apt install certbot
sudo certbot certonly --webroot -w /var/www/html -d your.domain.name
Enter your email address. Then hit A and press enter. And then hit N and press enter.
sudo cat /etc/letsencrypt/live/your.domain.name/privkey.pem \
/etc/letsencrypt/live/your.domain.name/cert.pem | \
sudo tee /etc/letsencrypt/live/your.domain.name/combined.pem
Next, ensure the lighttpd user www-data can read the required certificates:
sudo chown www-data -R /etc/letsencrypt/liveNow, place the following into /etc/lighttpd/external.conf (again, making sure to subsitute your.domain.name for your FQDN):
$HTTP["host"] == "your.domain.name" {
  # Ensure the Pi-hole Block Page knows that this is not a blocked domain
  setenv.add-environment = ("fqdn" => "true")

  # Enable the SSL engine with a LE cert, only for this specific host
  $SERVER["socket"] == ":443" {
    ssl.engine = "enable"
    ssl.pemfile = "/etc/letsencrypt/live/your.domain.name/combined.pem"
    ssl.ca-file =  "/etc/letsencrypt/live/your.domain.name/fullchain.pem"
    ssl.honor-cipher-order = "enable"
    ssl.cipher-list = "EECDH+AESGCM:EDH+AESGCM:AES256+EECDH:AES256+EDH"
    ssl.use-sslv2 = "disable"
    ssl.use-sslv3 = "disable"
  }

  # Redirect HTTP to HTTPS
  $HTTP["scheme"] == "http" {
    $HTTP["host"] =~ ".*" {
      url.redirect = (".*" => "https://%0$0")
    }
  }
}
Finally, be sure to run sudo service lighttpd restart after this change has been made.
Setting up automatic updates on Ubuntu server
With Ubuntu 20.04 and later the unattended-upgrade should already be installed, but just to be sure you can run this code.
sudo apt install unattended-upgrades update-notifier-commonNext we’ll edit the unattended-upgrades config.
sudo nano /etc/apt/apt.conf.d/50unattended-upgradesFind and remove the // in front of the following lines. On the automatic reboot time you may set whatever time you like. The default is 02:00.
// This option allows you to control if on a unclean dpkg exit
// unattended-upgrades will automatically run
//   dpkg --force-confold --configure -a
// The default is true, to ensure updates keep getting installed
Unattended-Upgrade::AutoFixInterruptedDpkg "true";

// Remove unused automatically installed kernel-related packages
// (kernel images, kernel headers and kernel version locked tools).
Unattended-Upgrade::Remove-Unused-Kernel-Packages "true";

// Do automatic removal of newly unused dependencies after the upgrade
Unattended-Upgrade::Remove-New-Unused-Dependencies "true";

// Do automatic removal of unused packages after the upgrade
// (equivalent to apt-get autoremove)
Unattended-Upgrade::Remove-Unused-Dependencies "true";

// Automatically reboot WITHOUT CONFIRMATION if
//  the file /var/run/reboot-required is found after the upgrade
Unattended-Upgrade::Automatic-Reboot "true";

// Automatically reboot even if there are users currently logged in
// when Unattended-Upgrade::Automatic-Reboot is set to true
Unattended-Upgrade::Automatic-Reboot-WithUsers "true";

// If automatic reboot is enabled and needed, reboot at the specific
// time instead of immediately
//  Default: "now"
Unattended-Upgrade::Automatic-Reboot-Time "02:00";
Type CTRL + X and then Y and enter to save the file.
Finally to enable the automatic upgrades, edit the 20auto-upgrades file as shown.
sudo nano /etc/apt/apt.conf.d/20auto-upgradesBy default this file has two lines as shown below.
APT::Periodic::Update-Package-Lists "1";
APT::Periodic::Unattended-Upgrade "1";
These lines allow you to determine how the upgrade will occur. The first line handles the update of the package lists while the second one initiates the automatic upgrades.
The value “1” enables the auto-update and the auto-upgrade respectively. If you want to disable it, set this value to “0”.
No changes are required here, just save and exit the file and then do a reboot before you continue.
sudo reboot